NuGet Package
If you are ready to integrate the Bynder Connector in your Sitecore solution, you should do so by using our NuGet package.
Installing
You install the package using either the NuGet Package Manager console in Visual Studio or right-clicking your solution or project and choosing "Manage NuGet packages..."
Use the following command to install the package with the NuGet Package Manager console.
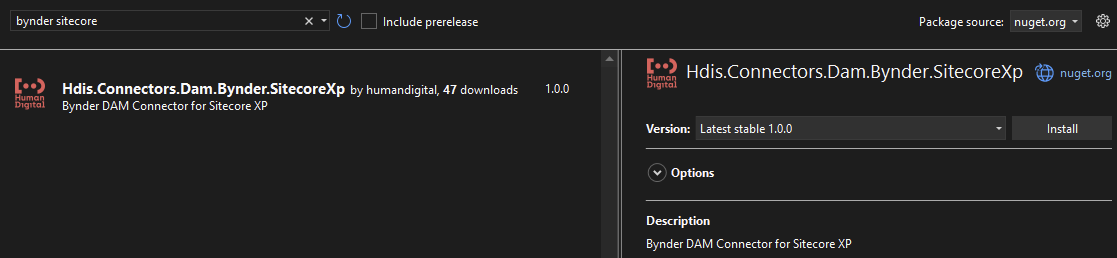
Install-Package Hdis.Connectors.Dam.Bynder.SitecoreXpIf you use the package manager UI, search for "Bynder Sitecore" to find the correct package.
packages.config
Projects that use the NuGet PackageReference stucture are not supported.
You must add the NuGet package to a project that uses the NuGet packages.config structure, otherwise the content files inside our package will not be added to your project.
Most .NET Framework projects are setup this way.
Package contents
The NuGet package contains the same files and items as the Sitecore installation package, but offers a better way of adding them to your Visual Studio solution.
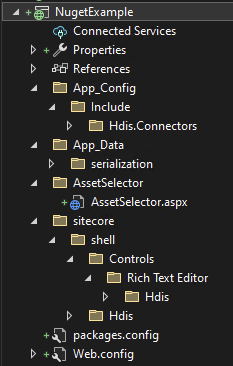
After installation, the package will have added:
- App_Config - Contains a single
.configfile that enabled the connector in Sitecore. - App_Data - Contains serialized Sitecore content items that must be present in the Sitecore master/core database.
- items (only for Sitecore 10.1 and higher) - Contains items as resources files that add the Sitecore items that the connector relies on.
- serialization (only for Sitecore 10.0 and lower) - Contains the serialized Sitecore items that the connector relies on. See Update Sitecore items.
- AssetSelector - Contains the markup for embedding the asset selection user interface.
- sitecore - Contains a few dynamic javascript files that help to enable connector features within the Sitecore client UI.
- Assembly references - References to
Hdis.Api.Dam.Bynder.Models.dllHdis.Connectors.Dam.Bynder.Common.dllHdis.Connectors.Dam.Bynder.SitecoreXp.dll
Publish files to Sitecore.
Make sure that you publish all the added files and custom assemblies (not those shipped with Sitecore!) to your Sitecore webroot, just like you do with the rest of your existing solution.
If you are using Sitecore 10.0 or prior and if you did not apply the Sitecore installation package on your development environment prior to adding the NuGet package, then you must restore the included serialized items. This adds the Sitecore items that are part of the Bynder Connector solution.
Update Sitecore items
The following only applies if you use Sitecore 9.3 to 10.0:
Assuming you have published the App_Data contents that was part of the NuGet package, you will be able to update your Sitecore content database with the items that we have supplied.
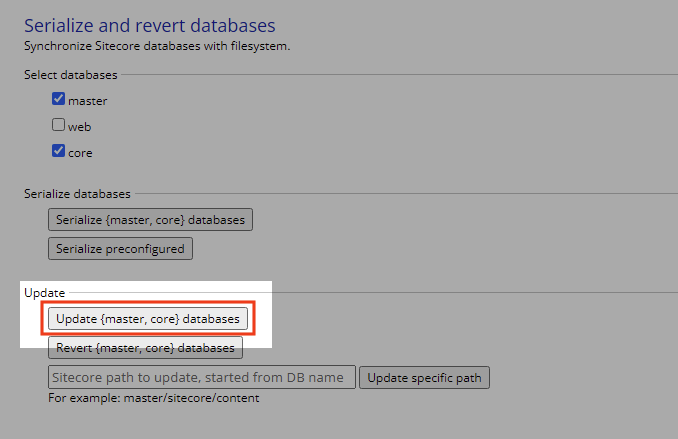
To do this, browse to the Sitecore serialization administration tool at
https://[your-sitecore-hostname]/sitecore/admin/serialization.aspx as an admin user.
Make sure that the master and core databases are selected and click the Update {master, core} database button.
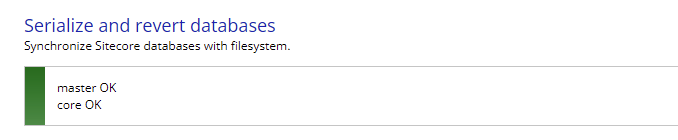
You will receive a confirmation when the update has completed.
The content items for the connector have now been installed and the connector is ready to be configured.
Note that the configuration notification dialog that is displayed after installation when using the Sitecore Installation Package, is not applied when installation occurs using the NuGet package. We assume developers are already familiar with the connector configuration process before they install the connector via NuGet.
If you are on version 1.5.0.4 or later, this notification dialog no longer applies because it has been removed.